Monday, May 31, 2010
Scientific Method: Magic Grow Capsules
If you're not familiar with them, they're Magic Grow Capsules. They are small sponge shapes compressed and enclosed in a capsule that dissolves in warm water. Look for them in the dollar section of your favorite retailer, or in the party favor area.
They're fun! And what better way to get your students interested in the scientific method than with something fun?
There are several ways you can go with these guys.
One simple variable to test is the water temperature. The instructions say to use warm water. How long does it take for them to open in warm water, cold water and hot water? A graph comparing the results would probably be appropriate.
Is water the only liquid that works? Try out some other liquids and see if they are equally effective (make sure your liquids are all at the same temperature... you only want to test one variable at a time).
Ask your students to generate other ideas... they will...
-do they still work if the capsules have been microwaved?
-will they work in cold water in the bell jar (air pressure removed)?
-will they work if I bury them in the ground and pour water over them?
Friday, May 28, 2010
A Wall of Scientists
One of the things I incorporated into my science lab was a wall filled with pictures of famous scientists.
I made sure to include the ones we specifically talk about throughout the curriculum as well as scientists with whom the students are familiar and others who I think have contributed to science in a comparably significant way.
I turned my scientists into puppets by attaching a tongue depressor/popsicle stick, so I could use them in that way, if I chose. It also provided a good spot to write their names.
I also added a small piece of magnet tape to the back of each so they could stick to my white board. They were adhered to the wall with tape.
I have several dozen of these guys. And most of them are guys. Which leads to some important discussions...
When you look at the entire history of science, most (but not all) of the work has been completed by white men. We might not like it, and that might not always be the case, but that's the way it was.
I chose my scientists based on the impact they had on the scientific community, in my humble opinion. Others may choose differently.
Thursday, May 27, 2010
Molecules: Shapes of Molecules
For example,
Carbon dioxide (O=C=O) has a central atom (C) with two atoms bonded to it and it has a linear shape.
Water (H-O-H) has a central atom (O) with two atoms bonded to it, but it has a bent shape.
Here’s a demonstration to help you students visualize molecular shapes. And catch your students attention!
Use balloons to represent the number of “things” around a central atom.
As mentioned before, carbon dioxide has two atoms around the central atom, so we tie two inflated balloons together, and voila! The linear molecule is formed:
How about carbon tetrachloride (CCl4) or another molecule that has four atoms surrounding the central atom? Tie four balloons together (I make two pairs of balloons and twist them together) and you’ve got the tetrahedral shape!
Now, back to that tricky water example….
If you draw the electron dot diagram for water, you’ll notice that there are not just two atoms around the central atom, there are also two electron pairs hanging out there. Those need to be accounted for as “things” around the central atom.
So… The oxygen atom in water has four “things” around it that need to be represented with our balloons. Just like with the carbon tetrachloride, I make two pairs of balloons, only this time, I make each pair out of a different color (one color represents the atoms, one color represents the electron pairs).
Twist the two balloon pairs together, and…
Let’s say the green balloons represent the hydrogen atoms…take a look, the green balloons are bent down into a bent shape. The yellow balloons are pushing them down, just as the electron pairs push the hydrogen atoms down!
Cool stuff!
Try it yourself and see what happens if you have 3, 5 or 6 “things” surrounding a central atom.
*********
This activity was presented by C. Lee in a workshop entitled “The End of Boring Biology and Confusing Chemistry” at the 2006 New Jersey Science Teachers Association Convention
Wednesday, May 26, 2010
Osmosis: Egg-speriment
A classic demonstration of osmosis using a large cell: an egg.
Place an egg in a beaker filled with vinegar for a day or two (over a weekend works well). The vinegar will remove the shell of the egg, leaving the cell membrane. Additionally the process of osmosis will begin with the water found in the vinegar.
Place the egg in a variety of other substances, for one night each.
Vinegar – water flows into the egg, increasing its size.
Water – water flows into the egg, increasing its size (but not as dramatic after a day in the vinegar)
Colored Water – water and dye particles flow into the egg, increasing its size and changing its color
Corn syrup – water flows out of the egg, decreasing its size
You can make the experiment as complex or simple as you wish. You can present this activity as a demonstration, or have students complete it as a lab experiment. Have students measure and record the egg’s dimensions by wrapping a string around the egg’s circumference. Students could also keep track of the volume of liquid that is placed in the beaker and how much remains the following day. After students have recorded data, they can graph it.
Make sure you have antibacterial cleaning supplies ready and available if you take on this lab, especially if you have students working with the eggs – some will break!
Tuesday, May 25, 2010
Gravity: Weight on Different Planets
(remember... weight is the measure of gravitational pull on an object, mass is the amount of "stuff" an object is made up of - that doesn't change)
In short:
The larger, more massive the planet, the more gravitational pull, the more something weighs.
The smaller, less massive the planet, the less gravitational pull, the less something weighs.
To help give students a feel for these differences, I created these:
(I've got a whole set, this is just a representative sample!)
I used this calculator (very cool - have your students play around with it to find their weight on other planets) and an Earth weight of 50 g.
The calculator gave me the following weights:
Mercury: 18.9 g
Venus: 45.3 g
Mars: 18.8 g
Jupiter: 118.2 g
Saturn: 45.8 g
Uranus: 44.4 g
Neptue: 56.2 g
Pluto: 3.3 g
I then created these containers, by taping two cups, filled with an appropriate amount of stuff, together.
It's probably not the best container, but it met these requirements:
1 - Light enough to account for the weight on Pluto when empty.
2 - Opaque - I didn't want students to see through the container. I wanted it to look like they were all the same thing, they just weighed different.
3 - I had them on hand.
I believe I mostly used dried peas/beans for the filling. Jupiter may have a few pennies or other more dense weight thrown in to bulk it up!
If you have a dense material on hand (lead, or something of that sort), you could use film canisters, which would be sturdier than my creation.
Monday, May 24, 2010
Air Pressure: How to Blow up a Balloon in a Bottle
Go ahead, give it a try. Place a balloon into a bottle (a 2 liter soda bottle works well), leaving a bit sticking out to blow into. Give it your biggest breaths. What happens?
You'll get about this far:
Why can't you get it any more inflated? There's still room in the bottle and the balloon can certainly stretch further than that.
What's wrong?
It's that pesky air pressure again.
The bottle is filled with air. When you start to inflate the balloon, it seals off the opening of the bottle. The air molecules that were in the bottle are stuck in the bottle - they can't get out. And, you're trying to push more air molecules into that space as you inflate the balloon.
Unless you've got lungs unlike any person I've ever known, you don't stand a chance pushing against those air molecules in the bottle.
But, what if you gave those molecules an escape?
Try again, but this time, stick a straw in the bottle with the balloon - the end of the straw needs to be sticking out of the bottle.
Now blow (on the balloon, not the straw!)...
That's more like it!
It's...
...a dinosaur coprolite.
What's a coprolite, you ask. A coprolite is fossilized dung. That's right. Dinosaur (in this case) poop that's been turned into rock through the fossilization process.
If that doesn't get the attention of your students - don't tell them until after they've passed it around, felt it, looked at it, etc - I don't know what will!
By the way, I've been told that my coprolite comes from a meat eating dinosaur - that apparently one can identify bits of bone within the fossil. I am not one of those people who can make that identification... I'm just passing along what I've been told.
Friday, May 21, 2010
What Is It?
Got any ideas?
************
What Is It? is a feature you can add to your classroom. Once a month, or thereabouts, put out something new and ask students to try to identify it. If they figure it out correctly, give them extra credit, a prize, a high five or bragging rights!
Thursday, May 20, 2010
Ideal Gas Law with a Balloon
The ideal gas law is basically a combination of a bunch of scientific laws relating to gases. It's stated as:
PV = nRT
P = pressure
V = volume
n = number of moles* of the gas
R = a constant (no need to worry about its value for our purposes)
T = temperature
In order to keep any equation balanced, if you change one thing in the equation, something else will change to compensate.
Here are some examples:
If you increase the number of moles of the gas, the volume it takes up will increase.
If you increase the pressure on the gas, the volume will decrease.
If you increase the temperature of the gas, the volume it takes up will incrase.
A balloon does a lovely job of containing a gas. Use one to demonstrate these properties of gases.
-Increase the number of moles of gas in the balloon (by blowing it up) --> the volume increases.
-Increase the pressure on the gas (by squeezing the balloon) --> the volume decreases.
-Decrease the temperature of the gas (by placing the balloon in a refrigerator) --> the volume decreases.
*A mole is simply a unit of measurement, like a dozen or a pair. In this case, it's a really big number: 6.02x10^23 but we use it the same way. A mole of atoms would be 6.02x10^23 atoms, a mole of people would be 6.02x10^23 people, a mole of eggs would be 6.02x10^23 eggs.
Wednesday, May 19, 2010
Animals: Spiders: Sticky Web
How are spiders able to walk on their own web without getting stuck?
Have students dip their fingertips into cooking oil and then “walk” their fingers across the sticky side of a piece of tape.
Tuesday, May 18, 2010
Topographic Maps: Treasure Hunt
This activity requires you to have access to a class set of quadrangle maps (a quadrangle map is a contour map that covers an area bound by lines of latitude and longitude).
It also requires a chunk of time to set up the first time. Once it's done though, you can just pull it out year after year.
Students will go on a "treasure hunt" using the map to move from destination to destination. This is done after students have had some experience with topographic maps and I ask several questions before the "hunt" to make sure students know what they're looking at.
The example I've provided below is based on the Yonkers Quadrangle, as the school I worked in was located in that quadrangle and we had several of these maps.
First, the background questions:
1. What is the scale for this map?
2. What is the contour interval for this map?
3. What does the color pink represent?
4. Draw the symbol for US Highway (Route).
5. Is the land flatter on the east side of the Hudson River or the west side?
6. How do you know the answer to #5?
7. What symbol do you find on all of the schools on the map?
8. Find the high school in Demarest. At about what elevation is it located?
9. What do you think all of the little symbols like this: {draw place of worship symbol here} represent?
Now, the treasure hunt:
Begin at NV Demarest. Walk due west until you reach Tenakill. Get in a canoe and paddle upstream until you reach St. Joseph's School. What town are you in? _____ Get in a waiting helicopter and fly over the Oradell Reservoir. What rail line did you have to fly over in order to get there? _____ After parachuting out of the helicopter, you land in the reservoir and swim over to Old Hook Road. After climbing the fence to get out of the reservoir, you get in a waiting car and drive along Old Hook Road. Ditch the car at Anderson Avenue. Old Hook Road changed names during your drive. What is the new name? _____ Hike southeast until you reach the water tower. At about what elevation are you? _____ Continue your hike due east until you reach Alpine School. By then you're tired of walking, so you steal some poor soul's mountain bike and continue heading east. The first obstacle you come to is a couple of major highways you must cross. What are they? _____ & _____ Once you've made it safely across, you have to head down to the Hudson River. Using your powers of estimation, how many feet do you descend from the time you cross the highways to the time you reach the river? _____ The bike becomes mangled in that large descent, so you're back to relying on your own two feet. Hike up to the Alpine Boat Basin. You borrow a speedboat and head across the Hudson River. The power plant across the river catches your eye, so you head there. Which New York county are you in now? _____ After refueling, you buy a ticket and hop on a train traveling south on the Penn Central Rail Lines. You can't explain why, but you decide to get off at the Sewage Disposal Plant. At this point, you're just north of which New York City borough? _____ The stench immediately gets to you, so you jump in the Hudson River and start swimming. You're trying to swim due west, but the downstream current is too strong, so you end up traveling southwest. You land at the Powder Dock back on the New Jersey side of the river. You're unready to face the long climb up again, so you start walking south until you reach the Englewood Boat Basin. At that point, it looks like you have no choice but to go up the cliffs. You're able to get a ride along Palisade Ave. but your ride is only going to the library in Englewood. You'll take what you can get. When you're at the library, you're near the intersection of what two major roads? _____ & _____ At the library, you find a topographic map of the Yonkers Quadrangle, and see that if you head north on Engle St. you'll find a wooded spot (as indicated by green on the map). Fortunately, a bus is coming by as you come out of the library, so you hop on and ride along Engle St. until you see the trees. Unfortunately, you didn't look very closely at the map in the library, because this wooded patch is the home of what? _____ Cemeteries freak you out so you start running due west until you reach Washington Ave. During the course of your run, you pass by four schools. What are they? 1._____ 2._____ 3._____ 4._____ Finally your luck has changed! There's a stretch limousine waiting for you at Washington Ave. Your driver takes you north on Washington Ave. until you reach the intersection of Washington Ave. and Main St. You're now in the downtown area of which town? _____ Bad luck strikes again! The limo has a flat tire and you've got to get home. You start walking west and in just a couple of blocks you find yourself crossing the railroad tracks. A freight train is passing by so you jump on. The sights are becoming more and more familiar, so you jump back off the train as it crosses Haworth Ave. Only a little further for your weary body to travel. You start walking east on Haworth Avenue, until you cannot move any further. You're at the intersection of Haworth Ave. and Valley Rd., pondering what to do when you look up and see a familiar sight. What is it? _____!!!!
Obviously, this is something you'll have to create specific to the map you're using, but this gives you an idea of how you can go about it.
If your school doesn't already possess quadrangle maps (check around, there might be some hidden away somewhere), you can purchase them through the US Geologic Society.
It also appears that Amazon has some quadrangle maps for sale. You probably need to know the exact map you're looking for (whereas the USGS will help you determine that, if you're not sure). But, it looks like the Yonkers Quadrangle can be found here. I can't vouch for the quality of these - I don't know if they're the same ones as offered by the USGS or not - but it is another option for those of you seeking a set of maps.
Sunday, May 16, 2010
Water: Mystery Jars
But look what happens when you knock the index card out of the way this time...
WHAT??? The water's still in the jar??? HOW???
The secret:
A piece of screen (regular window screen, found at your hardware store, or from a broken screen you have at home) placed inside the jar band.
Air pressure held the index card in placed, as discussed previously. Once the card is gone, surface tension takes over. The water molecules join together to form a membrane, strong enough to hold the water in, in the screen openings.
If you tip the jar, you'll break the surface tension, and...
This demonstration leads to some great experiments...
-how large of a screen opening can you use before the openings are too large to hold the water
-will other materials (cloth, etc.) work in the same manner
-what if you use soapy water
*******************************************************
PS While you're carrying out the demonstration, don't let the students see the top of the jar and the screen.
PPS You might want to do this with two jars and two volunteers. Set it up so that everything looks the same, except that one of the jars has a piece of screen in it and the other does not. Knock the index cards out of the way at the same time and SURPRISE! One of the jars spills all of its water, the other does not. Now, get someone to explain what happened!
Friday, May 14, 2010
Classroom Quotes
When I first started teaching middle school science, I had the privilege of working in the most beautiful science lab known to middle school teachers. It was only a few years old and looked like it came straight from the catalog - wow!
The thing is, it didn't look much like a middle school classroom... it didn't even look like most high school labs I've been in... it looked like a university lab. Lab tables filled with drawers and tons of glass fronted cabinets. Like I said... beautiful.
However, I wanted to make it a bit more middle-school-friendly (and hide some of the stuff in the cabinets - glass front is beautiful when you have your beakers neatly organized, but sometimes you just need a place to put stuff and you don't want everyone to see it).
I measured the glass in each cabinet and cut fadeless bulletin board paper (a little pricey, but it worked really well for this project - the width was perfect and the fade-less aspect was really nice - this was a big project, I really didn't want to recreate it every year) to size. Then I wrote quotes on some of the papers. The finished papers were taped into the cabinets.
Sadly, I can't seem to locate a picture of the classroom after the quotes were up, so you'll have to take my word for it that it made a huge difference. The brightly colored papers made the room more cheerful and welcoming, the quotes sparked some interest amongst students, and the stuff in my cabinets was no longer visible to the world!
Here are the quotes I used:
The only place success comes before work is in the dictionary.
Science... never solves a problem without creating ten more.
--George Bernard Shaw
The most important thing is not to stop questioning.
Mistakes are the portals of discovery.
--James Joyce
Imagination is more important than knowledge.
--Albert Einstein
We are each entitled to our own opinions, but no one is entitled to his own facts.
--Patrick Moynihan
Science is common sense at its best.
--Thomas Huxley
The best way to have a good idea is to have a lot of ideas.
--Linus Pauling
Discovery is seeing what everybody else has seen and thinking what nobody else has thought.
--Albert Szent-Gyorgi
Anybody who has never made a mistake has never tried anything new.
--Albert Einstein
For every fact there is an infinity of hypotheses.
--Robert M. Pirsig
Thursday, May 13, 2010
Periodic Table: Alternate Periodic Tables
Students are familiar with the modern periodic table, and may have seen Mendeleev's periodic table in their text book. However, they (as well as you) are probably unaware that there are other periodic tables around out there.
While probably not the most useful for studying, at this point in time, they can prove interesting to look at.
They demonstrate to your students that there isn't just one way to do/orgranize things. Can you determine the organizational scheme of each one?
This is my students all time favorite one - the "spaceship"!
You can find a few more periodic tables styles here (you'll have to scroll down the page a little bit). I have them printed out and laminated so they can be passed around the class.
Wednesday, May 12, 2010
Cell Building Blocks: Testing Food for Starch
Gather a variety of food items (fruits, veggies, crackers, chips, cheese, bread, lunchmeat, condiments, etc.-whatever you can find in your house).
Place a drop of iodine on each food item. If the item contains starch, the iodine will turn black (you may have to wait a minute or two. If there is no starch present, the iodine will remain dark purple/brown. The difference can be subtle... look carefully. Also consider the color of your food choices... it's easier to discern the difference on lighter colored foods.
Have students record data and look for patterns in the items that contain starch and those that don’t (think plants vs. animals).
Tuesday, May 11, 2010
Layers of the Earth: Bookmark
I billed it as a lesson in direction following....
Each student will need a 30 cm (about 12 inches... you're probably looking at construction paper) strip of paper, any width appropriate for a bookmark.
They will be creating a bookmark that illustrates a core sample of the whole earth (i.e. where the layers would occur if one were to drill a hole all the way through the earth).
In the textbook my students used, the layers of the earth were presented in two ways: the compositional layers (as seen above; the crust, mantle, and core) and the layers based on physical properties (lithosphere, asthenosphere, mesosphere, outer core and inner core).
I have create instructions for each "set" of layers. Here they are:
The Layers of the Earth, by Composition
1. You will be given a strip of paper 30 cm long.
2. Measure 1/2 (.5) cm from the top of the paper and draw a line.
3. Label this section "Crust".
4. Measure 7 cm from the previous line and draw a line.
5. Label this section "Mantle".
6. Measure 15 cm from the previous line and draw a line.
7. Label this section "Core".
8. Measure 7 cm from the previous line and draw a line.
9. Label this section "Mantle".
10. There should be 1/2 (.5) cm remaining at the end of the paper, label this section "Crust".
11. Color the two sections labeled Crust the same color.
12. Choose a second color and use it to color the two sections labeled Mantle.
13. Choose a third color and use it to color the section labeled Core.
The Layers of the Earth, by Physical Properties
1. You will be given a strip of paper 30 cm long.
2. Measure 1/2 (.5) cm from the top of the paper and draw a line.
3. Label this section "Lithosphere".
4. Measure 1/2 (.5) cm from the previous line and draw a line.
5. Label this section "Asthenosphere".
6. Measure 6-1/2 (6.5) cm from the previous line and draw a line.
7. Label this section "Mesosphere".
8. Measure 6 cm from the previous line and draw a line.
9. Label this section "Outer Core".
10. Measure 3 cm from the previous line and draw a line.
11. Label this section "Inner Core".
12. Measure 6 cm from the previous line and draw a line.
13. Label this section "Outer Core".
14. Measure 6-1/2 (6.5) cm from the previous line and draw a line.
15. Label this section "Mesosphere".
16. Measure 1/2 (.5) cm from the previous line and draw a line.
17. Label this section "Asthenosphere".
18. There should be 1/2 (.5) cm of space left at the end of the paper, label this space "Lithosphere".
19. Color the two sections labeled Lithosphere the same color.
20. Choose another color and use it to color the two sections labeled Asthenosphere.
21. Choose a third color and use it to color the two sections labeled Mesosphere.
22. Choose a fourth color and use it to color the two sections labeled Outer Core.
23. Choose a fifth color and use it to color the section labeled Inner Core.
In the past, I've had my students put one division of layers on each side of the bookmark. My latest idea has been to cut the papers twice as wide and have the students fold the paper in half.
Then, students can open up their bookmark and compare the two systems. You'll notice that the crust and lithosphere are comparable. The mantle is made of the asthenosphere and mesosphere. And the outer core and inner core should line up with the section simply labeled "core".
Monday, May 10, 2010
Air Pressure: A Cup, An Index Card & Some Water
If you aren't familiar with it, you should be - it's easy to do in any setting.
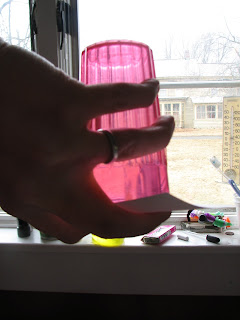
Fill a cup part way with water. Place an index card on top (make sure the card is large enough to completely cover the cup).
Pick up the cup, placing one hand on top of the index card.
Turn the cup over, holding the index card up with your hand.
Ask your students what they think will happen if you remove your hand that's holding the index card.
Then do it!
There really is water in the cup, I promise! My hand got in the way of the water line...
Air pressure doesn't just push down, it pushes on things in all directions. In this case, air molecules are pushing on the index card. They exert more pressure than the water pushing down does, so the card stays up.
If something breaks the seal, or the index card gets too wet (as it will after enough time has passed), the card will fall and water will gush out!
Friday, May 7, 2010
Test Review Raffle
To encourage your students to participate in a class review (or other comparable activity), hold a raffle at the end. For every correct answer the student supplies, she earns a raffle ticket. The more correct answers, the more tickets, the better chance to win. If you're using this for a test review, the most coveted prize would be some extra points on the test. Otherwise, use something that works into your pre-existing system.
Raffle tickets are available at office supply stores or online. Or you could create your own.
Thursday, May 6, 2010
Rate of Reaction: Glow Sticks
*Glow sticks work because of a chemical reaction.
Glow sticks contain two substances - one housed in the plastic casing and another inside a thin glass tube within the plastic. When the stick is bent, the glass breaks, allowing the two substances to react with one another. More information can be found here.
*The speed at which a chemical reaction occurs is dependent upon the temperature at which the reaction is occurring.
This is not the only factor that influences rate of reaction, just the only one we'll be talking about here.
For today's experiment:
You'll need two glow sticks* (two of the same color is best - makes it easier to compare), 2 glasses, hot water and cold water.
The water can come from the tap. I usually stick the glass of cold water in the freezer for a minute or two while I'm getting everything else ready, just to make it extra cold. I get as hot of water as I can from the tap. I suppose you could boil some water, but this works just fine and reduces the prep work.
Put your two glasses next to each other. Activate both glow sticks at the same time and place one in each glass.
Left side = hot water, Right side = cold water
After a minute or two, you'll notice that the stick in the hot water is glowing much brighter** than the one in the cold water. In fact, the one in the cold water will barely appear to be glowing.
The reaction that causes the glowing is occurring at a much more rapid pace in the hot water, thus the stronger glow.
Your students may have heard that they can save their glow sticks by placing them in the freezer. Doing so will slow down the rate of reaction, so the glow stick will last longer; but it doesn't stop the reaction, once the glow stick has been activated, it won't last forever, even in the freezer.
______________________________________________
*Keep your eyes on the dollar section of stores such as Target - you can occasionally find 12 sticks for a dollar there - makes it affordable enough to consider doing in the classroom.
**There really is a drastic difference in the 'amount' of glow being emitted from the two tubes, I promise. It doesn't photograph very well, at least not with my limited photography skills. So try it for yourself.
Wednesday, May 5, 2010
Microscopes: Cheek Cell Lab
View some animal cells under the microscope: your own!
Place a drop of iodine on a clean slide. Rub a toothpick along the inside of your cheek (not need to poke or jab, just a gentle rub). Dip the toothpick into the drop of iodine. Place a cover slip over the iodine and view under the microscope. You will note the irregular shape of the animal cell, as well as being able to identify the cell membrane and nucleus.
Tuesday, May 4, 2010
Mining: Birdseed Mining
This is based on an activity from the Women in Mining website. However, it not currently listed as one of their activities.
You'll need:
Bird seed mix (The mix will need to include sunflower seeds, and at least two other types of seeds. You'll need approximately 20 mL of birdseed for each pair of students.)
Small beads - "seed beads" - blue, gold and silver
50 mL beakers - 1 per pair of students
Prep Work:
For every 300 mL of birdseed, add 7 gold beads, 13 silver beads and 25 blue beads.
The activity:
Each pair of students is given 15-20 mL of prepared bird seed mixture.
Students search through the mixture and separate out (i.e. "mine") the sunflower seeds, millet, and beads, making piles of each.
Students count and record each pile of seed: sunflower seeds, millet, blue, gold, silver beads, and everything else (doesn't need to be separated, just counted).
Now for the math...
I typically provide my students with a data table (sometimes it's drawn on the board and they copy it into their notebooks, other times it's provided to them on a piece of paper).
I've tried to recreate said data table here, but have failed. Miserably.
So, here is a picture of said data table:
(I can't figure out why the photos is being rotated... that's just the way my day is going... I'm sorry, you'll have to turn your head, until I can figure out how to fix it).
Hopefully the picture makes things clear, but in case it doesn't, here is an explanation:
A dollar value is assigned to each of the mined substances:
Gold beads = Gold = $5
Silver beads = Silver = $4
Blue beads = Copper = $3
Sunflower seeds = Iron = $2
Millet = Lead/Zinc = $1
Other = Waste = n/a
Students will calculate the value of their mined materials by multiplying the number of pieces of each material by the value of the respective material.
Adding together these values will give students their Gross Income.
In addition, students will determine their expenses by multiplying the total number of materials (including waste - it costs money to dig up waste too!) by 0.23.
Gross Income - Expenses = Net Income (or Loss)
In addition, students can determine their % profit (or loss) with the following formula:
[Net Income (or Loss) / Gross Income] x 100
(In words: net income divided by gross income; that number multiplied by 100)