Monday, January 31, 2011

Earthquakes: Quake & Shake Challenge Part III

Your students have been busy planning, buying and building earthquake-resistant structures... now what? 

Shake Tables
To test just how earthquake resistant the structures are, you may want to invest in a shake table.  You can find these in various science supply catalogs or a quick Internet search will turn up instructions for tables you can build yourself using supplies found at a hardware store. 

I built one of those tables (and by that I mean that my husband built one for me using directions I found) and truth be told, it was big and heavy and didn't work as well as I would have liked given the time and effort put into it.  My kids were far more into the process than the final testing and it probably would have worked just as well to strap their buildings to a skateboard (or better yet, those carts they use in phys ed, with casters so they can move in all directions) and shake them around that way.

Final Write-Up
I had the students assemble a final write-up for the whole project.  Each member of the group was responsible for part of it and it was all compiled into one packet which was submitted to me.

Architect:
An essay answering the following:
  1. Describe your group's design idea
  2. Why did you decide on that design?
  3. How did your design stand up to the "earthquake"?
  4. What changes would you make to your design if you were to do this project again?
  5. What are the challenges of acting as the team's architect?
Blueprints for your building


Foreperson:
An essay answering the following:
  1. Describe the way in which your group members worked together - did you divide up the tasks or share all of them?
  2. What could be done to improve the way your group worked together, without changing group members?
  3. What strategies would you recommend to a future foreperson to help them help their group work well together?
A procedure detailing the steps you followed in building your structure.


Buyer:
An essay answering the following:
  1. Describe the materials used to build your structure.
  2. Why did your group choose to use those?
  3. What materials would you like to have available for this project?
  4. You built a model.  If you were to actually build this structure, what materials would actually be used (instead of Popsicle sticks, hot glue, felt, etc.)?
A list of materials used in building your structure and their approximate quantities.


Accountant:
An essay answering the following:
  1. Do you think your group spent their money wisely? Explain.
  2. What could your group have done to save money?
  3. What are the challenges of acting as the accountant?
  4. In the "real world", what expenses would a company have besides materials and employee salaries?
  5. What would happen if you went over-budget in the "real world"?
The accounting paperwork.


Evaluation
I've evaluated the project in different ways.  Here are some areas you may wish to consider when evaluating your students' work:
--Designing & Building the Model - use of construction methods and materials
--Testing and Improving the Model - was effort made to test and improve the model along the way?
--Final Product Performance - how did it hold up on the shake table?
--Blueprint
--Final Write-up - well-organized, interesting, clear
--Working Cooperatively with Classmates
--Budget
--Promptness and Completeness

Some years I've given students the opportunity to grade their team members and factored that into their grades

I've also asked them to answer the following questions
--Describe the successes and failures of your group's procedure.
--Evaluate your performance in the group effort.  What did you do?  Should you have done more?  Should you have let others do more?
--Evaluate your group memebers' effort.  Did they work well together?  Did everyone participate?  What could be done to make the group work better together (without changing group members)?


pdf Files
Here's the part you've been waiting for patiently for two weeks - the pdf files you can download - I imagine you'll want to change them to meet your needs, but it's a starting point. 
Quake & Shake Challenge (this the project information sheets and checks for the accountants to use)
Quake & Shake Account (sheet to use when purchasing materials for the groups)
Earthquake Write-Up (final write-up requirements)


Once again, please let me know if you are familiar with the original version of this activity so I can give proper credit - the bulk of this is not original to me. 

Email me or leave a comment with any questions you may have along the way.

And, most of all, have fun with this!  It takes a bit of prep work to get it going, but once you've done it, your students will work independently for several days and have a fabulous time doing so.

Friday, January 28, 2011

But It's Full...

Fill a cup with water.  All the way.  So you can't put another drop in the cup without some spilling out.

How many pennies do you think you can add to the cup before water will spill out? 

One?  Maybe two?

Give it a try....


Once again, we see evidence of water sticking to itself (cohesion) to form a strong surface.

Try again with a drop of soap mixed in with your water...

Thursday, January 27, 2011

Acid/Base Chemistry: Goldenrod Paper Indicator


If you can get your hands on some true goldenrod paper, you'll have yourself an indicator paper.

Goldenrod paper turns bright red in the presence of a base. 

The red color can be returned to the goldenrod color with an acid.


Dissolve some baking soda in water or use ammonia to paint and vinegar to erase. 

I know a high school science teacher who, on Halloween, would pretend to cut himself, "wash" his hand (with ammonia) and fling his hand at a sheet of this paper hanging on the board.  Totally freaked his students out!  He lists several other demonstrations using this paper on his website. 

Now, not all goldenrod paper is true goldenrod (i.e. it doesn't contain the real dye/extract), so you'll want to test yours out before passing it along to your students.  Astrobrights Galaxy Gold paper does work, so look for it at office supply stores if you're having a hard time finding paper that works.

Wednesday, January 26, 2011

DNA: Codon Bingo

Have your students fill in a blank Bingo card with amino acids - there aren't enough amino acids to fill a regular 5x5 card, so allow students to use each amino acid up to 2 times or use a smaller card.

Get 12 ping pong balls or practice golf balls.  Write A on three of them, C on three, G on three, and U on the last three.  Be careful... because the balls don't have an "up" side, C and U can look similar - you might want to put a line underneath each letter.  Place the ping pong balls into a bag or a hat.

Now play Bingo - pull 3 balls out of the bag, one at a time.  Have students translate those three letters into an amino acid and mark it on their Bing card if needed.

Return the balls to the bag, give it a shake and repeat.

You could write out all the 3 base combinations and pull them out of a bag, but I think the balls are more fun!   It would be even more fun if I could get my hands on one of those lottery/Bingo ball machines...

Tuesday, January 25, 2011

Earthquakes: Quake & Shake Challenge Part II

Last week I gave you an overview of the Quake & Shake Challenge and we left off with students ranking their job choices.

The following day, I let students know their teams and their job within the team.

At this time I also show the materials available for purchase and construction.
Toothpicks - $10 each
Foil - $150 per square foot
Gumdrops - $50 each
Pipe cleaners - $250 each
Yarn - $20 per foot
Clay - $50 per gram
Wood splints - $50 each
Thread - $30 per foot
Elmer's glue - $200 per gram
Rental glue gun - $100 per day
Hot glue sticks - $250 each
Cotton batting - $300 per square foot
Popsicle sticks - $30 each
Tissue paper - $250 per square foot
Rubber bands - $200 each
Plastic wrap - $100 per square foot
Floss - $25 per foot
Fishing line - $20 per foot
Wax paper - $175 per square foot
Felt - $375 per sheet
Cotton balls - $25 each

I would recommend you have a glue gun available for each team, as that is what they all seem to want to use - I use the low temp mini glue guns.  I guess you could limit the ones available and force them to go in other directions...  I would also recommend having an abundance of Popsicle sticks on hand as that seems to be a favored building material.

We also discuss a few other fees and fines..

Consultant Fees:
The teacher's role in this process is to act as a consultant.  If you have a question that the group cannot answer, you may pay the consultant $200 for each question.  Be sure to phrase the question carefully so that the response is not too simple (yes or no).

Fines:
Any item purchased must be incorporated in the model.  There is a penalty fee of $500 for each missing item.

Any group that does not clean up before class is over will be penalized $1000 for each safety violation. 


Armed with all this information as well as a team folder (containing plain white paper, graph paper, accounting ledgers, "checks" and shopping sheets) I send the teams off to begin planning.

While the teams are planning and sketching, I call the accountants together.  I provide each team with "checks" (each team's is printed on a different color paper) and a checkbook ledger.  With all of the accountants together, I show them how to fill in the checks and how to maintain the ledger.  The students interested in the accountant job are usually interested  in knowing this and it provides them with a real-world lesson.


The following day students can begin construction.  Since I taught a few grade levels, I had a cart loaded with all of the supplies available for purchase that I would roll out for the appropriate class periods. 

Next Tuesday we'll talk about testing the buildings, a group write-up/paper and tie up any other loose ends.  I will also try to make my documents available for you to download.

Monday, January 24, 2011

Measurement: Mix & Match Mass

This activity comes from Science Spot. Visit her site to find a ready-made-worksheet (and spend awhile looking around... you'll find a whole year's worth of great activities).

Provide students with a container of objects - I literally wander around my room gathering a collection of objects. Make sure you have objects that have a small mass (1 g or less) as well as larger/more massive objects (not pictured here), and that the sum of masses of all objects totals at least 400 g.

Students choose items (one or many) from the container that they believe will be closest to the target mass. After making their guess, they find the actual mass of the object(s) they selected.

Friday, January 21, 2011

Website: Marcia's Science Teaching Ideas

Marcia Krech's website, Marcia's Science Teaching Ideas, is filled with a lot of ideas for teaching Earth science.  There are many files that you can print off and use as long as you keep her copyright in tact.  Many of the activities are paper-based: worksheets, flashcards, etc.  There are some labs and some kinesthetic activities mixed in as well. 

For those of you who don't teach Earth science topics, you might find the sections on the metric system and experimental design helpful. 

Marcia also sells CDs of materials for a variety of topics, if that is something that is of interest to you.  Many of the CDs include PowerPoint presentations related to the topic as well as materials you can print off.  I don't have any first hand knowledge of the materials (just what's listed on her page), as I've only ever perused the free materials. 

Another source to add to your growing list...

Thursday, January 20, 2011

States of Matter: From Solid and Liquid to Gas

This is a very simple demonstration, good for very young students who are just beginning to grasp the differences between solids, liquids and gases.  It's also a fun demonstration of chemical changes for older students.  I mean really, who doesn't love a good baking soda and vinegar reaction?!?

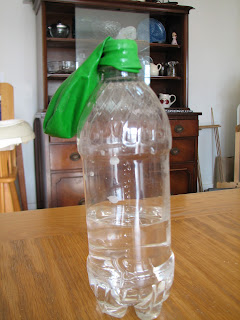
Put some baking soda into a balloon (you might want a funnel to do this).  You might want to put some on a plate as well, so the students can observe it. 

Pour some vinegar into a bottle.  You might want to allow the students to watch you pour, so they can see how the vinegar flows and takes the shape of the bottle. 

Place the balloon over the bottle, being careful not to dump the baking soda in at this point. 

Lift up the balloon, so the solid pours into the liquid.

In a matter of moments, you'll have captured the third state of matter: a gas (carbon dioxide).

Wednesday, January 19, 2011

Body Systems: Digestive System: Digestive System Model

Use these props to help your students visualize the size of their digestive system.  This model is approximate for a 3rd grade student.
Esophagus: a straw
I was told that a straw is approximately the size of a 3rd grader's esophagus.  It seems like it might be a little narrow, but I can't find any exact figures to confirm or deny this.  My doctor brother-in-law says that the esophagus, when there's no food present, becomes pretty narrow, so this might be more accurate than I thought.
Stomach: small dish detergent bottle (sorry, the bottle accidentally got recycled... )
Here's a bonus to this prop: when it's empty and you squeeze it, it makes noise!  Just like your stomach!

Small Intestine: 24' of rope (about 1 cm diameter)


 Large Intestine: 6' of tubing (about 2 cm diameter)

Tuesday, January 18, 2011

Earthquakes: The Quake & Shake Challenge

This is one of the greatest projects I've done with my students. I hope you'll stick with me through the explanations - there will be several posts full of lots of words and not many pictures (I've got pictures of students working on the project, but they aren't pictures I have permission to post on the Internet).

But, before I can tell you about the project itself, I need to disclose that this is not an original idea.  The original activity was called Shake, Rattle and Roll.  I have searched to the end of the Internet to find the original activity but cannot put my hands on it.  If someone else knows of it, PLEASE let me know so that proper credit can be given. 

Okay... that was a lot of rambling on... let's get to the good stuff.

The students are presented with the following task:
The city of San Francisco has given you a plot of land and a budget of $20,000 to design, build and test your model of a 3 story structure: house, apartment building, factory, etc. that is earthquake-resistant.  Each story must be a minimum of 15 cm high, contain a floor and have a base length and width of 20 cm x 20 cm.  The entire structure cannot exceed 50 cm. 

The purpose of your work is to use your knowledge of earthquakes to construct an earthquake resistant building within the budget limits and a time limit of 8 days.
On the day in which I tell students about their challenge, I also tell them about each of the 4 roles they can have on their team:

Construction foreperson: This person oversees the entire construction of the model.
  1. Communicates with the buyer on what materials are needed for the model.
  2. Communicates with the accountant regarding availability of funds.
  3. Responsible for testing on earthquake simulator.
  4. Promotes cooperation among all the builders.
  5. Salary: $200 per day

Architect: This person oversees the designing of the model.
  1. Draws the building plans with details and materials labeled.
  2. Drawing must be neat and to scale.  Use pencils, rulers, compass and/or protractor.
  3. Promotes cooperation among all the builders.
  4. Salary: $350 per day

Accountant: This person takes care of the entire budget and makes sure the team does not overspend.
  1. Responsible for checkbook balancing, check writing and signing
  2. Communicates with construction foreperson on availability of funds.
  3. Keeps a record of expenses and salary payouts.
  4. Promotes cooperation among all builders.
  5. Salary: $250 per day

Buyer: This person is the buyer of all supplies needed to construct the model.
  1. Purchase materials needed for construction
  2. Communicate with construction foreperson on supply needs.
  3. Communicate with accountant on funds needed and funds spent.
  4. May only go to Mrs. Hickland's Home Depot once per day.
  5. Promotes cooperation among all builders.
  6. Salary: $150 per day

After hearing of all the options, the students rank their job choices in order of preference.  Before leaving class, they hand me their ranked lists.  I make groups by attempting to give each student his/her first or second choice of job.  It usually works out that I can accommodate all students in that way.  However, if I have to resort to a lower choice for a student, I will usually try to compensate in some other manner, such as putting that student in a group I know he/she would enjoy working with. 

Tune back in next Tuesday when I share with you how things proceed after students receive their jobs and teams!

Monday, January 17, 2011

Mixing Colors

 Using the same technique used when learning to use a pipette, students can investigate mixing colors in a very simple, non-messy way.

Provide students with a pipette, wax paper, paper towel and  3 small cups - one with blue water, one with red water and one with yellow water.  Food coloring can be used to color the water (a small amount will go a long way), but food coloring does have the potential to stain, should the water spill.  Another option is to use the True Color Tablets available from Steve Spangler Science, which do not stain.

Students use the pipette to place drops of colored water on the wax paper.  They can then drag the different colored drops together and watch the colors mix. 

Challenge your students to make the entire color wheel.  Or see how many different shades of green they can create by mixing varying amounts of blue and yellow water.  Most importantly, allow them time to explore on their own to see what they can learn.

Friday, January 14, 2011

Water: Baby Powder Snowstorm

Fill a class container part way with water.

Sprinkle some baby powder on top of the water.  It will just stay on the top.  In fact, you could try to mix it in, and it would still just want to stay at the top.  The surface tension of water is such that it just holds those small baby powder particles on the top.

Now place a drop of dish detergent (or other soap) into the water....

Snowstorm!!

Soap breaks the surface tension of water (which is what makes it useful for cleaning) allowing the baby powder to fall through the water. It's interesting to watch - the powder will just fall through the hole made by the soap - the rest of it will continue to sit on top of the water. 

Thursday, January 13, 2011

Homemade Indicator Papers

If you've made some cabbage juice indicator and are looking for another way to save it for longer use, try making your own indicator papers.

Cut paper (I used coffee filters) into strips about 1/2" wide and a 2-3" long.

Submerge the strips in cabbage juice until they are fully soaked.

Remove the strips and place them in a warm spot to dry.

Store the dried strips in a resealable bag.

To use, place a drop of the liquid to be tested on the paper.  If it's a base, it will turn pink.  If it's a base, it will turn green.  And if it's neutral, there will be no color change.
The color change isn't as drastic as you'd see with litmus paper, but it's there. 

Wednesday, January 12, 2011

Is It Alive: Indian Corn


After discussing the characteristics of living things, present your students with a cob of Indian corn. 

What do they thing... Living or Non-living?

Let them discuss and without giving away any answers, stick the cob into a large, transparent container filled with dirt. 

Leave the container in a spot where it can be observed on a daily basis and watch what happens.


What do they think now?  Living or Non-living? 

Tuesday, January 11, 2011

Minerals: Website and Resources

The Mineral Information Institute has many resources available for your mineral and mining instruction.  The above graphic is one such piece of fascinating information.  (Here's the printable baby.)

The information is based around the central theme that minerals and natural resources are necessary for life and in fact find their way into nearly every aspect of our lives.  A Bright Smile from Toothpaste & Minerals  and How Many Minerals Does it take to Make a Light Bulb? are great examples of minerals found in places your students might not expect. 

Head to the Individual Lessons and Graphics page and start clicking - you'll find many titles that catch your eye. 

Monday, January 10, 2011

Density: Sink or Float?


In its most basic form, preschool students can complete this activity, but it can be a worthwhile experience for elementary students and can be made a bit more challenging for middle school students.

Provide students with an assortment of objects (make sure some float and some sink - some good floaters are aluminum foil, ping pong balls, candles, eye droppers).

Students hypothesize which objects will float and which will sink.  Older students can write down their hypothesis, while younger students can simply divide the objects into two piles.

Students then test the objects in a tub of water.

Older students could be challenged to calculate the actual density of each object. 

Friday, January 7, 2011

Website: Steve Spangler Science


If you aren't familiar with Steve Spangler Science, you should check it out. 

It's a great place to go for science activities, tools and toys.  If you're doing science experiments at home, you can find lots of equipment: pipettes, beakers, flasks, balances, etc.  And then there's the fun stuff... oh my, is there a lot of fun stuff!

A few of my favorite products:


Baby Soda Bottles Test Tubes & RackBaby Soda Bottle Test Tubes

 UV Color Changing BeadsUV Color Change Beads


Energy BallEnergy Ball

There is also a whole collection of science experiments.  Some of them require supplies available through the site, but many do not. 

There's also the blog and the teacher training opportunities to check out.  I'm hoping to some day find myself at the right time and place to attend one of the Hands-On Science Boot Camp Workshops - what fun they have!  And the Alaskan cruise filled with hands-on science doesn't sound too shabby either... :)

Head on over to Steve Spangler Science and see if it isn't worth your time to explore a bit!

Thursday, January 6, 2011

Simple Machines: Balance a Lever

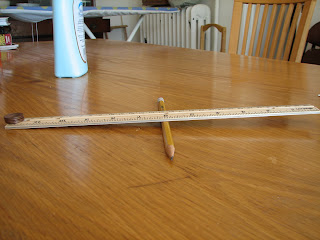
Place a pencil on the table.  This is your fulcrum.

Place a ruler on the pencil, so it balances at the 6 inch mark.  This is your lever.

Place 5 pennies on one end of the ruler.  Determine where you need to place another stack of 5 pennies so the ruler balances once again.


Clear the ruler.  Place 2 pennies 3 inches from the pencil.  Where do you need to place a stack of 3 pennies so that the ruler balances once again?

Continue playing with your ruler lever, coming up with as many equations as you can.

Examples, from above...
5 pennies x 6 inches = 5 pennies x 6 inches
2 pennies x 3 inches = 3 pennies x 2 inches.

With enough experimentation (some students will require more than others, some will grasp the idea immediately) students should come to the conclusion that if they multiply the number of pennies by the distance from the pencil, it will need to equal the number of pennies on the other side multiplied by the distance those pennies are from the pencil.

Wednesday, January 5, 2011

Natural Selection: Can you find me?

Mark off a 1 square meter (or yard) section of grass. Scatter a selection of colored toothpicks in the marked off area – you will want to count the number of toothpicks of each color before you scatter them.

Provide a group of students with ~15 seconds to pick up as many toothpicks as they can find. Count and record the number of each color that was collected. Repeat this exercise several more times.

After returning inside, students can graph the data. You should find that the green toothpicks were found in smaller numbers, especially in the early trials.

Tuesday, January 4, 2011

Solar System: The Planets to Scale: Part II


While planet size is out-of-whack in textbooks, it's nothing compared to the distances between planets.  Most textbook pictures look a little something like my picture above (except, of course, the planets all look much closer in size), the planets are all right next to each other.  The textbooks do it for the same reason that I did: it's the way to make all the planets fit. 

There's so much empty space in space that it's darn near impossible to show students both the planets and their orbits to scale.

But, if you want to give it a shot, pick up your props from last week's solar system and head out for a walk....

Start at the sun and walk 190 feet.  Place the peppercorn (Mercury).

Walk 170 feet.  Place the mini-marshmallow (Venus).

Walk 131 feet.  Place the Gobstopper (Earth).

Walk 263 feet.  Place the split pea (Mars).

Walk 601 yards (about 1/3 mile).  Place the soccer ball (Jupiter).

Walk 1/3 mile.  Place the melon (Saturn).

Walk 1 mile.  Place the baseball (Uranus).

Walk 1 mile. Place the small apple (Neptune).

Walk 1 mile.  Place the sprinkle (Pluto).

You've walked more than 3 1/2 miles from the sun to get to that tiny sprinkle of Pluto.  How much sun do you think Pluto sees?  Not much! 

Given that you probably don't want to walk your students out 3 1/2 miles (and then back 3 1/2 miles), you might want to have them walk the first 190 feet, to get an idea of the distance.  And, then you could determine where each of the other planets would fall, within your school and community.  For example, the Earth is at the cafeteria, or Uranus is at McDonalds. 

It's completely mind-boggling and a lot to think about!

Monday, January 3, 2011

Air Pressure: Penny in a Balloon


Place a penny inside an uninflated balloon.

Blow up the balloon, most but not all the way.  Tie the balloon.

Dip a pin or needle in some cooking oil.  Poke the pin into the balloon, into the end opposite the knot.  Remove the pin.

Hold the knot and twirl the balloon around, so the penny goes to the bottom.  Have the penny cover the hole made by the pin.

Turn the balloon over and observe the penny - it "sticks" to the top of the balloon. 

By inflating the balloon, you increased the air pressure.  The force of those air molecules is greater than the force of gravity, so the penny stays where it is.  (It doesn't take much of a force from your finger to overcome the force of those air molecules!)