Pages

Friday, April 30, 2010

What Is It?


Got any ideas?

************
What Is It? is a feature you can add to your classroom. Once a month, or thereabouts, put out something new and ask students to try to identify it. If they figure it out correctly, give them extra credit, a prize, a high five or bragging rights!

Thursday, April 29, 2010

Electricity: The Human Circuit


First, you'll need to find the "equipment". You're looking for some sort of 'toy' that has two contact points, like those shown above. The toy will 'do' someting when the circuit is completed: mine are "ice" cubes that light up in water, I've seen Easter chicks that cheep when the circuit is complete. Unfortunately, I can't tell you exactly where to find these, you just have to keep your eyes open. My best advice is to check out Walgreens/CVS/RiteAid around the holidays.

Once you have procured your supplies, the activity is very simple:

Have the class stand in a large circle. Everyone needs to hold hands. You'll be a part of the circle, one of your hands will hold a student's hand. In the other hand, you'll hold the 'toy', with one of your fingers covering one of the contact points. You'll need a student to stand on the other side of the 'toy', covering the other contact point.

If the entire class is holding hands, you'll have a complete circuit and the "ice" cubes will light up, the chick will cheep, etc. If there is a pair that isn't making contact, nothing will happen.

Expand the activity by looking for some conductors and insulators to include in your circuit!

In addition to a discussion of complete vs. incomplete circuits, it's also a chance to talk about electrolytes in your body (hence the ability for electricity to travel through bodies).

Wednesday, April 28, 2010

Plants: Seed Germination


Each student will need a sandwich-size zip-top bag, a paper towel, and several seeds (dried beans from the grocery store will work, as well as regular garden seeds).

Get the paper towel wet and then wring out all the excess water. Flatten the towel and fold in half and then in half again (in the opposite direction this time). Slide the towel into the bag. Place the seeds in a line about an inch from the bottom of the bag (about an inch between the seeds). With the bag lying flat on the table, squeeze out as much air as possible and seal the bag. Now observe. You may wish to have students make observations in a journal. With a good seal, the bag should have enough moisture and not require any additional water.

I prefer this method over planting seeds in dirt for two reasons:

1 - No dirt=much easier clean-up.

2 - You can actually wantch the seed germinate.... which part emerges first, where does it emerge from, etc.

Tuesday, April 27, 2010

Plate Tectonics: Snack Tectonics

What can you do with fruit roll-ups, graham crackers and frosting in your science class?

Have a yummy snack?

You could, but try out this great activity first... then have your snack!


In this Windows to the Universe activity, students use these items to model the different types of plate boundaries: divergent, convergent (oceanic vs. continental and continental vs. continental) and transform.

The fruit roll-ups act as the oceanic crust and the graham crackers are the continental crust (because continental crust is thicker than oceanic). The frosting serves as the mantle, on which the pieces of crust can move around.


Windows to the Universe also provides these great graphics you can turn into PowerPoint slides, overheads, or place on your students' lab sheets.

With materials like these, you'll immediately have your students' attention. And the results aren't too shabby either!


In my experience, the most exciting result comes from the continental - continental convergent boundary - mountains are created!!


Monday, April 26, 2010

Scientific Thinking: Dogs and Turnips

Scientists use the information they find/learn/acquire along with their own background knowledge to make hypotheses to explain what they're observing. As they acquire more information, those hypotheses can change to incorporate the new information. Scientific knowledge constantly changes.

This activity demonstrates this process, in a classroom-friendly, time-friendly manner. It's a new activity to me, but looks like a keeper. Exact instructions can be found here, but here's a synopsis.

A long sentence - The big fat red dog walked into the little white house on the prarie carrying a bone and ate his bowl of turnips - is printed and cut into individual words, which are placed in an envelope.

Students select 5 words from the envelope. Using the words they've selected, they hypothesize what the story is about.


An additional 5 words are selected. Using all 10 words, the students tweak their hypothesis to incorporate the new information.


Another 5 words are selected. Using all 15 words, the students refine their hypotheses some more.


Finally, all the remaining words are removed from the envelope and a final hypothesis is created.

Even after all the groups have all the information, they will likely have variations in their hypotheses. Why? What does this tell us about science?


Additionally, Liz LaRosa blogged about her use of the activity and has been generous enough to share her worksheets for use with this activity. If you haven't checked out www.middleschoolscience.com, you really need to - it's loaded with great stuff!

Friday, April 23, 2010

ProjectWET


I first became interested in ProjectWET (Water Education for Teachers) when I saw my friend's ProjectWET Curriculum & Activity Guide. I have no shame in admitting that I highly coveted this book - it was filled with so many wonderful, easy-to-implement activities, for grades K through 12 - and set out to find a copy of my own.

I quickly learned that the only way to get your hands on a copy of said book (other than pocketing your friend's book when she's not looking - Hi Anna!) is to take a ProjectWET workshop. The book is included in the small workshop fee. I was extra fortunate - the local water company (part of a very LARGE water company) offered the workshop free to local teachers - score!

Anyway... it's worth the minimal fee (I would happily pay it), for both the workshop and the book. During the course of the workshop, you'll try several of the activities for yourself, led by a trained facilitator.

At the ProjectWET website, you'll find information for contacting your local ProjectWET coordinator. And, ProjectWET isn't just for teachers - 4-H leaders, scout leaders and homeschooling parents are all welcome participants.

Keep your eyes open for ProjectWET workshop opportunities. And, if there's nothing on the horizon, why don't you gather your own group of 15-30 participants and ask ProjectWET will schedule a workshop for your group.

Thursday, April 22, 2010

Solubility: Tie Dye Nametags

Here's an art project, that's totally based on science!

Background information:
Substances are classified as polar and non-polar (if you're interested in learning more about what exactly this means, I'll let you Google it). Polar substances can dissolve other polar substances (water is polar, sugar is polar, therefore sugar can dissolve in water), but they cannot dissolve non-polar substances (water is polar, oil is non-polar, therefore water cannot dissolve oil). This is summarized as "like dissolves like".


For this activity you'll need:
**Cardstock
**Shaving Cream
**Pie pans
**Food Coloring
**Toothpicks
**Straight edge tool (for scraping) - a ruler works
**Paper Towels

The procedure:
1. Spray a layer of shaving cream into the pie pan.
2. Add a few drops of food coloring to the top of the shaving cream (you can use multiple colors).
3. Use a toothpick to mix the color into the shaving cream.
4. Place the piece of cardstock on top of the shaving cream.
5. Peel off the cardstock and place face up on paper towel.
6. Using the straight edge, scrape off the shaving cream from the cardstock.
7. Allow cardstock to dry (won't take very long).

You can dye multiple pieces of cardstock with the same shaving cream before it needs to be replaced.

Why it works:
Paper and food coloring are polar substance so the paper absorbs the food coloring. Shaving cream is mostly non-polar, therefore the paper will not absorb it.

Wednesday, April 21, 2010

Food Webs/Chains: Producer/Consumer Collage


A simple activity to make sure students know the difference between producers and consumers. An activity in and of itself for younger students. For older students, a way to check mastery of the terminology before delving into more complex relationships.

Divide a piece of paper in half. Label one side “producer” and the other side “consumer”. Search through magazines and newspapers to find images and/or words that name producers and consumers. Cut out and glue to the appropriate side of the paper. You may choose to add a “decomposers” category as well.

Tuesday, April 20, 2010

Layers of the Earth: Edible Models


It looks like the Earth, right? Wait, don't answer that. And no smart answers as to what it does look like... please...

Okay, so not the most beautiful model ever, but stick with me on this one. It's a great model for younger students (4th grade, or so), who are beginning to learn about the layers of the Earth, as it emphasizes the most basic features.

First, a quick review of the layers of the Earth:
The core is very hot. And, it's under so much pressure that the inner core (this activity doesn't differentiate between the inner and outer core) is actually solid.

The mantle is large. And it's semi-soft - the crust floats on the mantle, moving about over time.

The crust is a very thin, hard layer.


Now we need some edible materials to represent each layer:


I present to you:
A cinnamon candy (some people call them red hots - they're little, red, hard candies, sometimes found in the candy aisle, sometimes found with cake decorating supplies) = hot, hard, small

A marshmallow = large, squishy

Magic Shell ice cream topping* = thin, crunchy


To create your model:
Push a cinnamon candy into the center of the marshmallow. Then, pour a small amount of Magic Shell over the marshmallow. Pop the whole thing into the freezer for a few minutes, to harden the shell/crust. Then, enjoy!


*In the past, I tried meling chocolate chips and using those to coat the marshmallows. It worked okay, but it was more work to keep them melted (I used my slow cooker) and they never do harden into a crust. I think the Magic Shell works pretty well, though you do need to be able to refrigerate or freeze your models for a few minutes, which might be a problem for some. Nothing's pefect... go with what works for you!

Monday, April 19, 2010

Metric System: Metric Label Project

Look for metric units in the world around you!


Collect 10 labels from products that have metric measurements (even though we live in an English system, products still bear metric units). Labels can be paper, cardboard, or plastic.

Fasten each label to a single sheet of paper, one label per page.

Label each page:
---the amount of metric measurement (ex. 453 grams)
---unit of measure (mass, volume, length)

Number each page, on the bottom of each page

Assemble the pages into a book

Design a cover related to the metric system

Extra Credit:
3 points each for labels in METRIC ONLY. Fasten each of these to a separate page and put in your booklet after page 10


Scoring:
2 points for each page = 20 points
5 points for the cover = 5 points
-------TOTAL--------- = 25 points

Depending upon your students, you may wish to require them to have a certain number of mass labels, volume labels, and length labels. FYI: length labels are the most difficult to locate, mass labels are easy to find.

All in all, a simple project, easy to grade, but it increase students' awareness of the metric system and helps bridge the gap between science class and their lives outside of school.

Friday, April 16, 2010

Favorite Website: Daryl Science


Several years ago, I had the opportunity to attend a workshop on science demonstrations presented by physics teacher, Daryl Taylor. He's full of energy, ideas and life. There's a lot to sort through on his website, but there are some gems are to be found. To get to his list of demos, click on Professional Stuff, then Science Teacher Demos. They're organized by branch of science.

The demos on Daryl's site are geared to high school students (some very advanced high school students at that), but don't let that stop you from checking things out. There are always ideas that are applicable across the ages, and others that can be adapted to meet your needs. Sometimes you just need to see what someone else has come up with to get your own creative juices flowing!

Thursday, April 15, 2010

Periodic Table: Periodic Table Projects


Check out Jane Bush's periodic table project. My students have had a great time when I assigned them this project - using her directions and her rubric to grade. Her site is also loaded with pictures of her students' projects. (Though you might not want to let your students know that... let them come up with their own ideas!)


By the way... the photo above is of my creation - my students came up with MUCH better periodic tables, I just can't locate the photos at the moment. My simpleton version did work to give them an idea of the project and also worked to help them understand periodicity - they knew exactly what should have been in the missing spots!

Wednesday, April 14, 2010

Diffusion: Food Dye in Water


A very simple way to illustrate diffusion. Place a clear container filled with water on a table in the front of the room. Add a drop of two of food dye to the water. Point out to the students how dark and concentrated the dye is initially. The dye will spread out until it has reached an equal concentration throughout the entire container.

Tuesday, April 13, 2010

Minerals: Birthstone Non-Report

Have your students investigate a mineral, but make it more personal for them - have them research their own birthstone.


FYI: Most June babies will say their birthstone is a pearl. Since a pearl is made by a living thing, it is not a mineral. Fortunately, the alternative birthstones are moonstone and alexandrite, which are minerals.


Now, I don't know about you, but I'm really not much for reading reports. In addition to the dull, repetitive nature of them, in my experience, there is also the increased likelihood of plagerism.

Thus, I present the Non-Report...


The Non-Report needs to include the following information:-Name of the birthstone
-Color(s)
-Physical Properties (hardness, streak, density, crystal structure, cleavage/fracture, luster, specific gravity, etc.)
-Chemical composition and how that relates to its color
-Uses (besides jewelry)
-Where it is mined/found
-Other interesting information (cost, legends, etc.)


Some Non-report ideas:-Kids' book (along the lines of Magic School Bus, for example)
-Video or live performance - skit, song, rap, puppet show, infomercial....
-Ad (like the glossy jewelry ads in the newspaper)
-The life story of ___________ as told by ___________
-Autobiography of _______________
-Newspaper article, as if you're its discoverer


And, I'm not really a big poster person (they take up too much room!), but will sometimes offer a poster option, if they do it in a foreign language (talk to the foreign languages teachers at your school - maybe they'll offer students credit for taking on this option)

Monday, April 12, 2010

Observation: Find My...

I've seen many variations of this activity. The first time I did it, we used peanuts (in their shells). Most schools would probably prefer you avoid peanuts, which is easy enough to do. I've also done it with apples, pond stones (you can buy a bag of polished ones in a craft store), shells, etc. Regardless of what you use, the procedure is the same...


You're the proud parent of a newborn pond stone. Take your newborn and fill out a "birth certificate" - provide measurements and a detailed descriptions, as well as a birth picture.

Your stone is now 2 years old and interested in playing with the other stones in your neighborhood. Mix up all the toddler stones at your table and try to find yours.

Your stone is now 4 years old and headed to preschool. Gather all the stones from 3 neighborhoods (lab tables) together at a central preschool. Again, mix them up and try to find yours.

Time to head to kindergarten! Everyone in the class will bring their stone to the kindergarten. Additionally, some stones from another town are bussed in, so they will be added to the mix. Mix all the stones together and try to find yours, one last time.


Some questions to consider:
-When was it easiest to find your stone?
-When was it the hardest?
-How were you able to identify your stone?
(These questions work better for apples, shells, and peanuts):
-What is a variation?
-What were some variations you noticed in the stones?

*******************************
A variation on the activity:
After students have identified their stone within the groups, have them exchange descriptions with another student. Can that student find their stone? Can they kind the other student's stone?

A good lesson in providing thorough descriptions and complete information.

Friday, April 9, 2010

How Does That Work? Wine Rack


The wine bottle appears to defy gravity in this wonderful gadget. I've been told you can find all variety of these in wine stores, online, etc. Or you can make your own (or have your dad make you one in celebration of your college graduation :) There are instructions throughout the internet, but basically, you take a slab of wood (mine measures about 9" long by 3 or 4" wide, cut a hole in one end,

and trim the edges so they are at 45 degree angles.

In a classroom setting, you'd obviously want to use some sparkling juice instead of wine. I believe that if you make the hole big enough, you could also use a 2L bottle of soda. I wasn't able to test it out - mine isn't large enough to accomodate such a large bottle.

The bottle holder works based on the principle of center of gravity - can your students figure it out?

*****************
How Does That Work is a series of products and demonstrations that you can present to your students and challenge them to explain the science of how they work. Make sure you decide ahead of time what you'll accept as a valid explanation - can it be printed straight off the internet, written in the student's own words, or does the student need to be able to explain it to you conversationally? What will a valid explanation earn the student - a prize, extra credit, a feeling of goodness?

Thursday, April 8, 2010

Air Resistance: Crumpled vs. Flat


Crumple one sheet of paper into a ball and keep a second sheet flat. Drop both pieces of paper from the same height.

The crumpled piece of paper will fall to the ground faster, because it has a small surface area, thus comes in contact with fewer air molecules and is subject to less air resistance.

Wednesday, April 7, 2010

Plants: Celery in Colored Water


You may have done this as a kid!

Cut about an inch off the end of a stalk of celery, so you have a fresh end. Place the celery in a cup of colored water and allow to sit for a few days while you observe.

Because the water is carrying food dye with it, you will be able to see the path the water takes as it moves up the stem and into the leaves. This provides a great visualization of the vascular system contained in most plants.


It’s also fun to place white daisies (or other white flowers) in colored water and watch the petals change color. I’d recommend doing the celery first, because you can see the xylem in the celery stem and therefore see how the water travels up the stem.

Tuesday, April 6, 2010

Moon: Phases of the Moon Demonstration

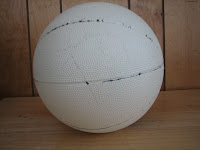
First, you'll need to create your prop:
Start with a large ball (playground ball, basketball, etc.) Use masking tape to mark the 'equator' around the ball. Paint one half of the ball white and the other half black.

For the demonstration:
Show the students the moon - explain that the sun shines on the moon, as it does the Earth, so that one half the moon is receiving light (the white side of the moon model) and the other half of the moon is in the dark (the black side of the moon model).

Then lay out the scenario:
The students, at their desks, are residing on the Earth.
The chalkboard/whiteboard at the front of the room is the sun (you could even draw a picture of the sun, if you wished).
The moon travels around the Earth, so you will carry the ball around the classroom, in a large circle that encompasses all of the students.

Remember.... the white side of the moon model always needs to face the sun!

Begin at the front of the classroom. Hold the moon so the white side is facing the sun. When the students, on Earth, look at the moon, they should only see the black side - this is the arrangement of the Earth, sun, and moon when there is a new moon.


Move to the back of the classroom. Hold the mood so the white side is facing the sun. When the students, on Earth, look at the moon, they should only see the white side - this is the arrangement of the Earth, sun, and moon when there is a full moon.


You can then move to the sides of the classroom, stopping at various points so students can see varying amounts of white and black, illustrating waxing and waning, crescents and gibbous moons, first quarter moon and third quarter moon.


You may wish to have students draw sketches of what they see as the moon circles the Earth.

Monday, April 5, 2010

Air Pressure: Collapse a Milk Jug


Heat some water to near boiling. Pour the hot water into the milk jug and swirl it around to heat the entire container. Pour the water out and quickly cap the milk jug. Within a few minutes, as the air inside the jug cools, the jug will collapse.

The hot water heats the air inside the jug, causing the air molecules to move faster and some of them move out of the jug. By capping the jug, you don't allow any air molecules to re-enter the jug and have created an area of low pressure. The pressure outside of the jug is greater, causing it to collapse.

Friday, April 2, 2010

Favorite Website: Science-Class.net


Lots of good stuff to be found on this website. You'll likely find some links to this site in some of my posts, sharing how I've implemented some of her ideas. But, I don't want to hold out on you, so check out the site yourself to find a whole cache of good stuff.

Thursday, April 1, 2010

Refraction: Spot the Penny


Place a penny in the bottom of an opaque cup. Set the cup on a table or counter. Keep your eye on the penny as you step back from the cup. Continue to step back until you can no longer see the penny. Pour water into the cup (if you can reach, or have someone else pour it for you), and as it fills the penny will appear due to the refractive nature of water.

If you have difficulting with the penny moving while you're pouring the water in, you could glue the penny to the bottom of the cup ahead of time. You'll have it set up for years to come, and you'll know for sure that you're seeing the penny because of refraction, not because it moved.